本系列为
Django官方文档学习笔记。文档地址:https://docs.djangoproject.com/zh-hans/3.2/contents/
环境:
macOS10.13.1 + python3.7.3 + Django3.2
一,初识 Django
Django 最初被设计用于具有快速开发需求的新闻类站点,目的是要实现简单快捷的网站开发。
- 设计模型
Django 无需数据库就可以使用,它提供了 对象关系映射器,通过此技术,可以使用 Python 代码来描述数据库结构。
- 应用数据模型
1 | $ python manage.py makemigrations |
该 makemigrations 命令查找所有可用的模型,为任意一个在数据库中不存在对应数据表的模型创建迁移脚本文件。migrate 命令则运行这些迁移来自动创建数据库表。
享用便捷的
API一个动态管理接口:并非徒有其表
当模型完成定义,Django 就会自动生成一个专业的生产级 管理接口 ——一个允许认证用户添加、更改和删除对象的 Web 站点。
规划
URLs编写视图
视图函数的执行结果只有两种:返回一个包含请求页面元素的 HttpResponse 对象,或者是抛出 Http404 这类异常。至于执行过程中的其它的动作则由你决定。
一个视图的工作就是:从参数获取数据,装载一个模板,然后将根据获取的数据对模板进行渲染。
- 设计模板
Django 允许设置搜索模板路径,这样可以最小化模板之间的冗余。在 Django 设置中,你可以通过 DIRS 参数指定一个路径列表用于检索模板。如果第一个路径中不包含任何模板,就继续检查第二个,以此类推。
二,编写你的第一个 Django 应用,第 1 部分
查看 Django 版本:
1 | (base) ☁ demo_django [master] ⚡ python -m django --version |
创建项目:
1 | (base) ☁ demo_django [master] django-admin startproject mysite |
1 | mysite/ :项目的容器 |
运行项目:
1 | (base) ☁ mysite [master] ⚡ python manage.py runserver |
- 创建投票应用
在 Django 中,每一个应用都是一个 Python 包,并且遵循着相同的约定。Django 自带一个工具,可以帮你生成应用的基础目录结构。
应用是一个专门做某件事的网络应用程序——比如博客系统,或者公共记录的数据库,或者小型的投票程序;
项目则是一个网站使用的配置和应用的集合。项目可以包含很多个应用;应用可以被很多个项目使用。
创建 polls 应用:
1 | (base) ☁ mysite [master] ⚡ python manage.py startapp polls |
编写视图:
1)polls/views.py
1 | from django.shortcuts import render |
2)polls/urls.py
1 | #!/usr/bin/env python |
3)mysite/urls.py
1 | from django.contrib import admin |
函数 path() 具有四个参数,两个必须参数:route 和 view,两个可选参数:kwargs 和 name。
route:是一个匹配URL的准则。当Django响应一个请求时,它会从urlpatterns的第一项开始,按顺序依次匹配列表中的项,直到找到匹配的项,注意:这些准则不会匹配GET和POST参数或域名;
view:当Django找到了一个匹配的准则,就会调用这个特定的视图函数,并传入一个HttpRequest对象作为第一个参数,被“捕获”的参数以关键字参数的形式传入;
kwargs:任意个关键字参数可以作为一个字典传递给目标视图函数;
name:为URL取名能使你在Django的任意地方唯一地引用它,尤其是在模板中。这个有用的特性允许你只改一个文件就能全局地修改某个URL模式。
三,编写你的第一个 Django 应用,第 2 部分
- 数据库配置
编辑 mysite/settings.py 文件前,先设置 TIME_ZONE 为你自己时区。
INSTALLED_APPS 默认包括了以下 Django 的自带应用:
django.contrib.admin— 管理员站点;
django.contrib.auth— 认证授权系统;
django.contrib.contenttypes— 内容类型框架;
django.contrib.sessions— 会话框架;
django.contrib.messages— 消息框架;
django.contrib.staticfiles— 管理静态文件的框架。
创建数据表:
1 | (base) ☁ mysite [master] ⚡ python manage.py migrate |
- 创建模型
模型是真实数据的简单明确的描述,它包含了储存的数据所必要的字段和行为。Django 遵循 DRY Principle 。它的目标是开发者只需要定义数据模型,然后其它的杂七杂八代码都不用关心,它们会自动从模型生成。
Django 的迁移代码是由你的模型文件自动生成的,它本质上是个历史记录,Django 可以用它来进行数据库的滚动更新,通过这种方式使其能够和当前的模型匹配。
polls/models.py
1 | from django.db import models |
每个模型被表示为 django.db.models.Model 类的子类;每个模型有许多类变量,它们都表示模型里的一个数据库字段。
每个字段都是 Field 类的实例 - 比如,字符字段被表示为 CharField ,日期时间字段被表示为 DateTimeField ,这将告诉 Django 每个字段要处理的数据类型。
每个 Field 类实例变量的名字(例如 question_text 或 pub_date )也是字段名,所以最好使用对机器友好的格式。你将会在 Python 代码里使用它们,而数据库会将它们作为列名。
- 激活模型
mysite/settings.py
1 | INSTALLED_APPS = [ |
执行项目迁移命令:
1 | (base) ☁ mysite [master] ⚡ python manage.py makemigrations polls |
sqlmigrate 命令接收一个迁移的名称,然后返回对应的 SQL:
1 | (base) ☁ mysite [master] ⚡ python manage.py sqlmigrate polls 0001 |
项目检查:
1 | (base) ☁ mysite [master] ⚡ python manage.py check |
运行迁移命令:
1 | (base) ☁ mysite [master] ⚡ python manage.py migrate |
- 初识
API
1 | (base) ☁ mysite [master] ⚡ python manage.py shell |
polls/models.py
1 | import datetime |
1 | In [1]: from polls.models import Choice, Question |
- 介绍
Django管理页面
创建管理员账号:
1 | (base) ☁ mysite [master] ⚡ python manage.py createsuperuser |
启动服务:
1 | (base) ☁ mysite [master] ⚡ python manage.py runserver 8080 |
向管理页面中加入投票应用:
polls/admin.py
1 | from django.contrib import admin |
四,编写你的第一个 Django 应用,第 3 部分
Django 中的视图的概念是 一类具有相同功能和模板的网页的集合。
- 编写更多的视图
polls/views.py
1 | from django.http import HttpResponse |
polls/urls.py
1 | #!/usr/bin/env python |
每个视图必须要做的只有两件事:返回一个包含被请求页面内容的 HttpResponse 对象,或者抛出一个异常,比如 Http404 。
polls/views.py
1 | from django.http import HttpResponse |
首先,在 polls 目录里创建一个 templates 目录。Django 将会在这个目录里查找模板文件。
项目的 TEMPLATES 配置项描述了 Django 如何载入和渲染模板。默认的设置文件设置了 DjangoTemplates 后端,并将 APP_DIRS 设置成了 True。这一选项将会让 DjangoTemplates 在每个 INSTALLED_APPS 文件夹中寻找 “templates“ 子目录。
在 templates 目录里,再创建一个目录 polls,然后在其中新建一个文件 index.html 。换句话说,你的模板文件的路径应该是 polls/templates/polls/index.html 。因为app_directories 模板加载器是通过上述描述的方法运行的,所以 Django 可以引用到 polls/index.html 模板。
polls/templates/polls/index.html
1 |
|
更新视图 polls/views.py
1 | def index(request): |
render():载入模板,填充上下文,再返回由它生成的 HttpResponse 对象。
polls/views.py
1 | from django.shortcuts import render |
- 抛出 404 错误
polls/views.py
1 | def detail(request, question_id): |
polls/templates/polls/detail.html
1 | {{ question }} |
get_object_or_404():尝试用 get() 函数获取一个对象,如果不存在就抛出 Http404 错误。
polls/views.py
1 | from django.shortcuts import render, get_object_or_404 |
- 模板系统
去除模板中的硬编码 URL, polls/templates/polls/index.html:
1 | <li><a href="{% url 'detail' question.id %}">{{ question.question_text }}</a></li> |
为 URL 名称添加命名空间
polls/urls.py
1 | app_name = 'polls' |
polls/templates/polls/index.html
1 | <li><a href="{% url 'polls:detail' question.id %}/">{{question.question_text}}</a></li> |
五,编写你的第一个 Django 应用,第 4 部分
- 编写表单
polls/templates/polls/detail.html
1 | <h1>{{ question.question_text }}</h1> |
polls/views.py
1 | def vote(request, question_id): |
1 | def results(request, question_id): |
polls/templates/polls/results.html
1 | <h1>{{ question.question_text }}</h1> |
- 使用通用视图
Django 提供一种快捷方式,叫做“通用视图”系统。
改良 URLconf:polls/urls.py
1 | urlpatterns = [ |
改良视图:polls/views.py
1 | class IndexView(generic.ListView): |
默认情况下,通用视图 DetailView 使用一个叫做 <app name>/<model name>_detail.html 的模板;ListView 使用一个叫做 <app name>/<model name>_list.html 的默认模板
六,编写你的第一个 Django 应用,第 5 部分
- 基本测试脚本编写
自动化测试 是由某个系统帮你自动完成的。当你创建好了一系列测试,每次修改应用代码后,就可以自动检查出修改后的代码是否还像你曾经预期的那样正常工作。
Bug 复现:
1 | (/anaconda3) ☁ mysite [master] python manage.py shell |
创建测试:polls/tests.py
1 | import datetime |
运行测试:
1 | (/anaconda3) ☁ mysite [master] ⚡ ppython manage.py test polls |
修复 Bug:polls/models.py
1 | def was_published_recently(self): |
- 测试视图
Django 提供了一个供测试使用的 Client 来模拟用户和视图层代码的交互。
在 shell 中配置测试环境:
1 | (/anaconda3) ☁ mysite [master] ⚡ ppython manage.py shell |
导入 django.test.TestCase 类:
1 | In [3]: from django.test import Client |
1 | In [5]: response = client.get('/') |
改善视图:polls/views.py
1 | from django.utils import timezone |
1 | class DetailView(generic.DetailView): |
编写测试类:polls/tests.py
1 | def create_question(question_text, days): |
关于测试的建议:
1)对于每个模型和视图都建立单独的
TestClass;2)每个测试方法只测试一个功能;
3)给每个测试方法起个能描述其功能的名字。
七,编写你的第一个 Django 应用,第 6 部分
django.contrib.staticfiles 存在的意义:将各个应用的静态文件(和一些你指明的目录里的文件)统一收集起来,这样一来,在生产环境中,这些文件就会集中在一个便于分发的地方。
- 自定义应用的界面和风格
在 polls 目录下创建一个名为 static 的目录,Django 将在该目录下查找静态文件。
在刚创建的 static 文件夹中创建一个名为 polls 的文件夹,再在 polls 文件夹中创建一个名为 style.css 的文件。
polls/static/polls/style.css:
1 | li a { |
polls/templates/polls/index.html:
1 | {% load static %} |
八,编写你的第一个 Django 应用,第 7 部分
- 自定义后台表单
通过 admin.site.register(Question) 注册 Question 模型,Django 能够构建一个默认的表单用于展示。
polls/admin.py:
1 | # Register your models here. |
1 | class QuestionAdmin(admin.ModelAdmin): |
- 添加关联对象
1)向后台注册 Choice :polls/admin.py
1 | from .models import Question, Choice |
2)改进注册方式:polls/admin.py
1 | class ChoiceInline(admin.TabularInline): |
- 自定义后台更改列表
默认情况下,Django 显示每个对象的 str() 返回的值。但有时如果我们能够显示单个字段,它会更有帮助。为此,使用 list_display 后台选项,它是一个包含要显示的字段名的元组,在更改列表页中以列的形式展示这个对象。
polls/admin.py:
1 | class QuestionAdmin(admin.ModelAdmin): |
使用 display() 装饰器来改进 polls/models.py:
1 | from django.contrib import admin |
使用 list_filter,polls/admin.py:
1 | class QuestionAdmin(admin.ModelAdmin): |
- 自定义后台界面和风格
Django 的后台由自己驱动,且它的交互接口采用 Django 自己的模板系统。
在工程目录(指包含 manage.py 的那个文件夹)内创建一个名为 templates 的目录。模板可放在你系统中任何 Django 能找到的位置。
mysite/settings.py:
1 | # 仔细检查路径, [BASE_DIR. / 'templates'] 官方写法不是很支持 |
DIRS 是一个包含多个系统目录的文件列表,用于在载入 Django 模板时使用,是一个待搜索路径。
在 templates 目录内创建名为 admin 的目录,随后,将存放 Django 默认模板的目录(django/contrib/admin/templates)内的模板文件 admin/base_site.html 复制到这个目录内。
查找 Django 源码位置:
1 | (/anaconda3) ☁ mysite [master] ⚡ python -c "import django;print(django.__path__)" |
1 | (/anaconda3) ☁ mysite [master] ⚡ cp /anaconda3/lib/python3.7/site-packages/django/contrib/admin/templates/admin/base_site.html templates/admin |
九,进阶指南:如何编写可重用程序
可重用性是 Python 的根本。
一个
package提供了一组关联的Python代码的简单复用方式。一个包(“模块”)包含了一个或多个Python代码文件。一个包通过
import foo.bar或from foo import bar的形式导入。一个目录(例如polls)要成为一个包,它必须包含一个特定的文件__init__.py,即便这个文件是空的。
Django应用仅仅是专用于Django项目的Python包。应用会按照Django规则,创建好models,tests,urls, 以及views等子模块。
使用 setuptools 来打包程序。
1 | (/anaconda3) ☁ mysite [master] ⚡ pip list | grep set |
1)在 Django 项目目录外创建一个名为 django-polls 的文件夹,用于盛放 polls。
1 | (/anaconda3) ☁ demo_django [master] ⚡ mkdir django-polls |
2)将 polls 目录移入 django-polls 目录。
1 | (/anaconda3) ☁ demo_django [master] ⚡ mv mysite/polls django-polls |
3)创建一个名为 django-polls/README.rst 的文件。
1 | (/anaconda3) ☁ demo_django [master] ⚡ vi django-polls/README.rst |
4)创建一个 django-polls/LICENSE 文件。选择一个非本教程使用的授权协议,但是要足以说明发布代码没有授权证书是不可能的 。
1 | (/anaconda3) ☁ demo_django [master] ⚡ vi django-polls/LICENSE |
5)创建 setup.cfg 和 setup.py 文件用于说明如何构建和安装应用的细节。
1 | (/anaconda3) ☁ demo_django [master] ⚡ vi django-polls/setup.cfg |
6)默认包中只包含 Python 模块和包。为了包含额外文件,我们需要创建一个名为 MANIFEST.in 的文件。
1 | (/anaconda3) ☁ demo_django [master] ⚡ vi django-polls/MANIFEST.in |
7)创建一个空目录 django-polls/docs 用于未来编写文档。额外添加一行至 django-polls/MANIFEST.in。
1 | (/anaconda3) ☁ demo_django [master] ⚡ mkdir django-polls/docs |
8)构建应用包通过 ptyhon setup.py sdist (在 django-polls 目录内)。这将创建一个名为 `dist 的目录并构建应用包, django-polls-0.1.tar.gz。
1 | (/anaconda3) ☁ django-polls [master] ⚡ python setup.py sdist |
9)安装应用包。
1 | (/anaconda3) ☁ mysite [master] ⚡ python -m pip install --user ../django-polls/dist/django-polls-0.1.tar.gz |
10)验证应用包安装,并相应启动工程项目,还原项目。
1 | (/anaconda3) ☁ mysite [master] ⚡ pip list | grep dj |
11)卸载应用包。
1 | (/anaconda3) ☁ mysite [master] ⚡ python -m pip uninstall django-polls |
12)构建虚拟环境。
如果使用的是 Python 3.3 或更高版本,则该venv模块是创建和管理虚拟环境的首选方式。venv 包含在Python 标准库中,不需要其他安装。
1 | # 创建环境 |
十,编写你的第一个 Django 补丁
获得 django 开发版的副本:
1 | (base) ☁ projects git clone git@github.com:django/django.git |
你可以在用命令 git clone 下载仓库的时候加上参数 --depth 1 来跳过 Django 的提交历史,这大约能把下载大小从 268MB 减少到 64MB。
创建并激活虚拟环境:
1 | (base) ☁ ~ python3 -m venv .virtualenvs/django3.2 |
安装开发副本:
1 | (django3.2) (base) ☁ ~ python -m pip install /home/projects/django |
安装相关依赖:
1 | (django3.2) (base) ☁ tests [stable/3.2.x] ⚡ brew install libmemcached |
1 | (django3.2) (base) ☁ django [stable/3.2.x] cd tests |
运行测试套件:
1 | (django3.2) (base) ☁ tests [stable/3.2.x] ./runtests.py |
当 Django 的测试套件被执行时,将看到一个代表测试运行状态的字符流。 其中字符 E 表示测试中出现异常, F 表示测试中的一个断言失败,这两种情况都被认为测试结果失败。而 x 和 s 分别表示与期望结果不同和跳过测试,逗点则表示测试被通过。
1 | ............... |
- 运行单元测试
使用 tox 运行测试:
1 | (django3.2) (base) ☁ tests [stable/3.2.x] python -m pip install tox |
tox 是通用的virtualenv管理和测试令行工具,旨在自动化和标准化 Python 中的测试。可用于:
检查您的软件包是否使用不同的
Python版本和解释器正确安装;在每个环境中运行测试,配置您选择的测试工具;
充当持续集成服务器的前端,大大减少了样板并合并了
CI和基于外壳的测试。
tox 工作流程:
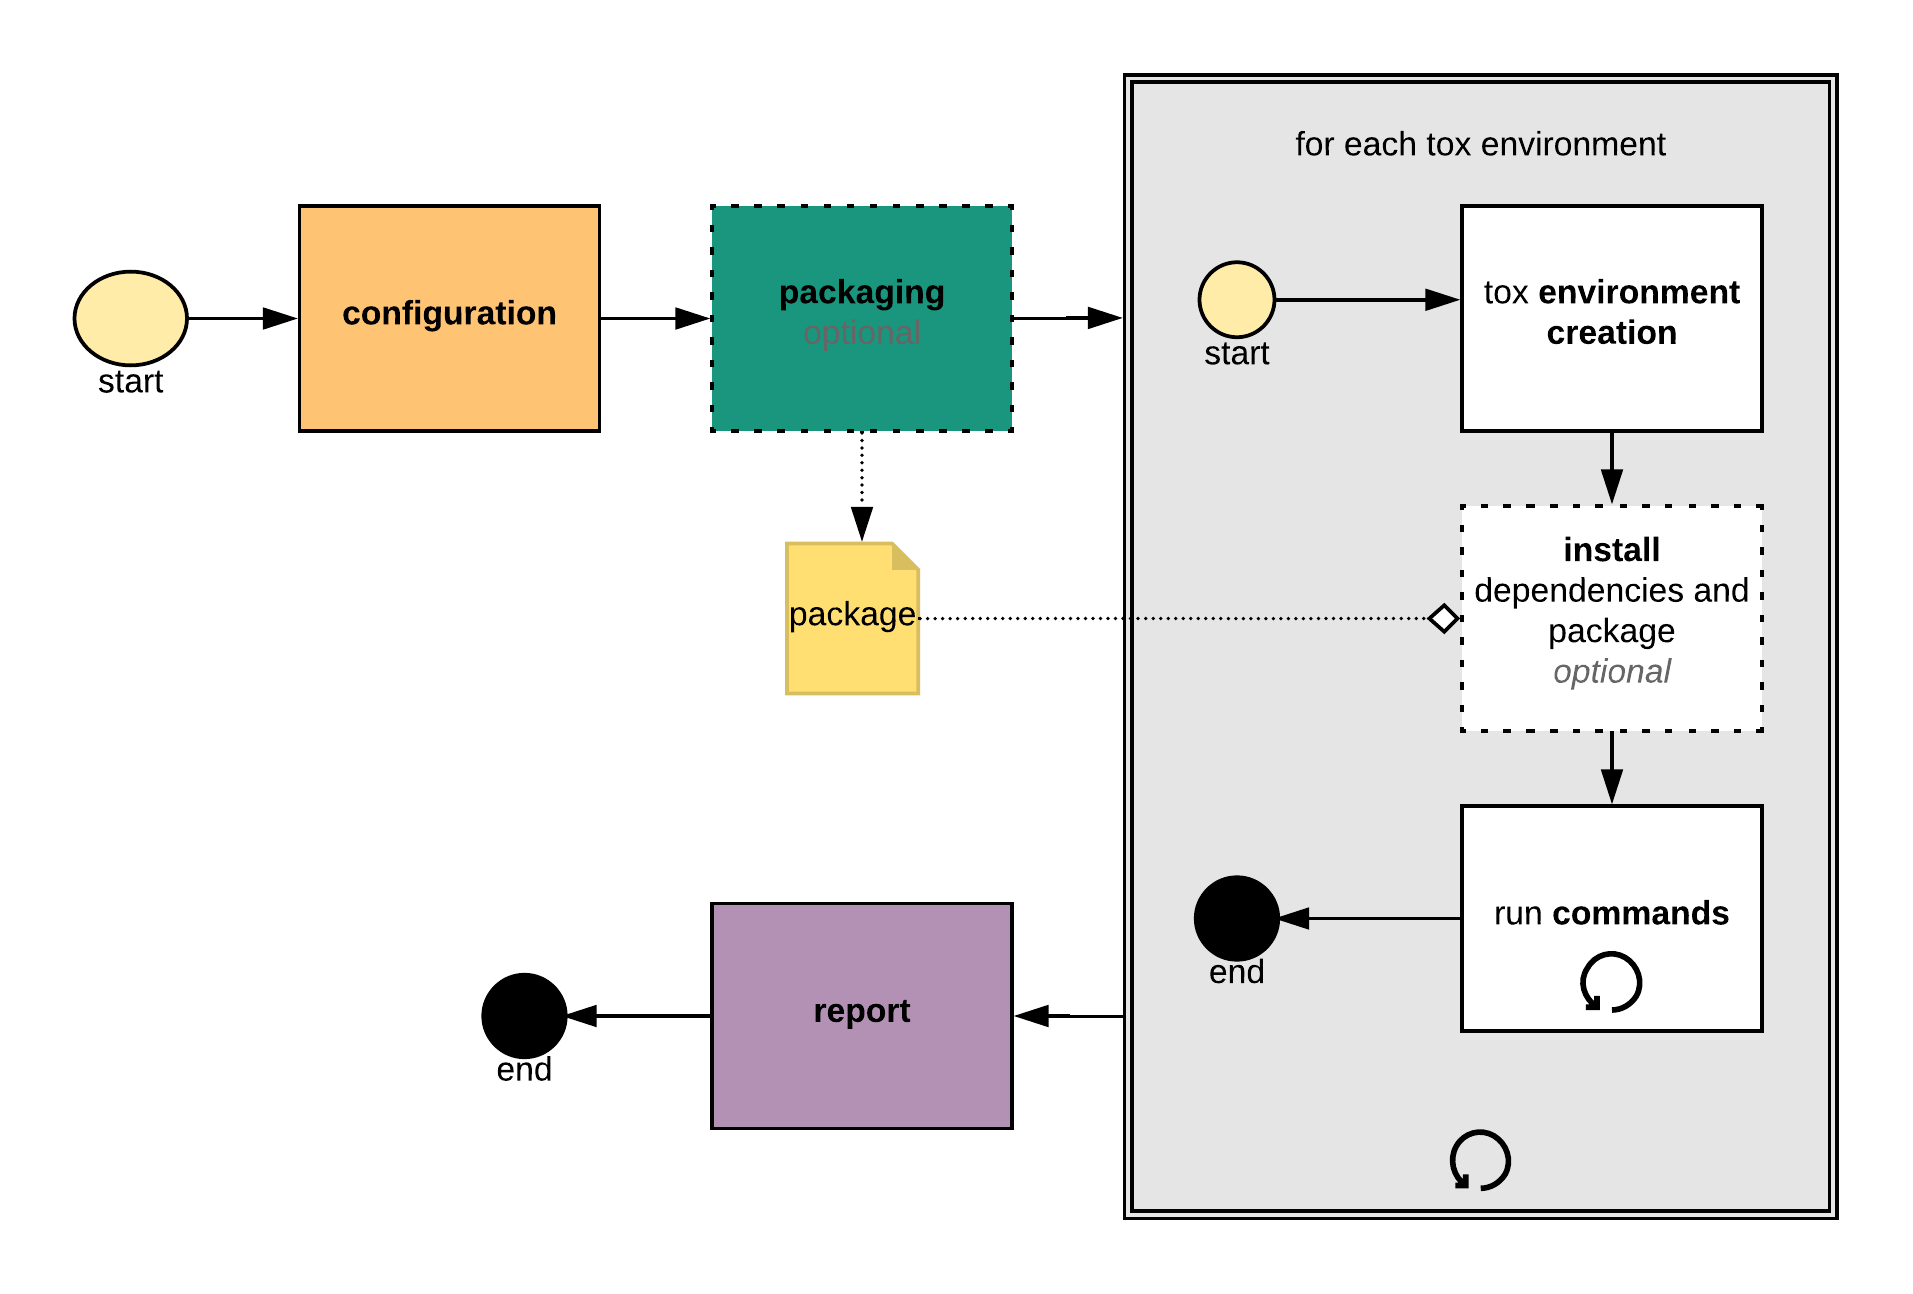
创建补丁分支:
1 | (django3.2) (base) ☁ django [stable/3.2.x] git ck -b ticket_99999 |
前往 Django 的 tests/shortcuts/ 文件夹,创建一个名为 test_make_toast.py 的新文件。
1 | #!/usr/bin/env python |
打开 django/ 文件夹中的 shortcuts.py 文件,在文件末尾追加:
1 | def make_toast(): |
运行测试:
1 | (django3.2) (base) ☁ tests [ticket_99999] ⚡ ./runtests.py shortcuts |
再次运行 Django 测试套件:
1 | (django3.2) (base) ☁ tests [ticket_99999] ⚡ ./runtests.py |
打开文件 docs/topics/http/shortcuts.txt ,然后在文件末尾追加下记内容:
1 | ``make_toast()`` |
打开 docs/releases/3.2.txt 文件,即发布说明的最新版本文件,在小标题”Minor Features“下面添加一个说明:
1 | :mod:`django.shortcuts` |
准备提交:
1 | (django3.2) (base) ☁ tests [ticket_99999] ⚡ git add --all |
十一,项目问题及解决方案
1,zsh 问题,具体描述如下:
1 | (base) ☁ demo_django [master] gitk |
解决方案:zsh: command not found: gitk
2,关联远程仓库
1 | (base) ☁ demo_django [master] git remote add origin git@github.com:zhangbc/demo_django.git |
3,修改 git 历史提交
解决方案:git 修改已提交的内容